| ← Chapter 1 Capital Causeway |
Factory Fright Chapter 2 Variation: Factory Fright - Flooded |
Chapter 3 → Wild Web Woods |
Factory Fright is the second chapter in Yooka-Laylee and the Impossible Lair. The state change variation is Flooded, and Factory Fright is the chapter after Capital Causeway and it's the chapter before Wild Web Woods.
Overview[]
After Yooka and Laylee complete Chapter 1 - Capital Causeway, the player has access to Chapter 2 - Factory Fright, Chapter 3 - Wild Web Woods, and Chapter 4 - Frantic Fountains.
Factory Fright is the second world presented to the player, and introduces more difficult platforming and timed jumps, as there are dozens of red buzzsaws around the chapter. In the middle of the level, a giant and fast buzzsaw that can kill the player in one hit chases the player around a rolling section.
Environment[]
T.W.I.T Coins[]
| Coin | Description | Image |
|---|---|---|
|
~Coin 1~ |
During the downwards vertical zig-zag section the player goes down through, the first T.W.I.T. coin is found in a door below and to the right of the third checkmate (Fig. 1a). After entering the room, a hidden area will be revealed (Fig. 1b). Jump through the obstacles and platforms to claim the first T.W.I.T. coin. |  (Fig. 1a) A door on the right below the third checkmate leads to a hidden room.  (Fig. 1b) A hidden room filled with enemies!   (Fig. 1c) Go through the obstacles and collect the first T.W.I.T. coin! |
|
~Coin 2~ |
To the left of the third checkmate and near the end of the vertical zig-zag section, there is a door blocked by breakable boxes (Fig. 2a). Upon entering the room, there will be a single sawblade blocking a trap door (Fig. 2b). Buddy slam the trap door to reveal another secret room (Fig. 2c). Break the boxes to the left and collect the second T.W.I.T. Coin (Fig. 2d). |   (Fig. 2a) Enter the room blocked by boxes after the third checkmate.   (Fig. 2b) Go through the trap door gaurded by the sawblade by buddy slamming through it!   (Fig. 2c) A hidden room with a T.W.I.T. coin box to the left.  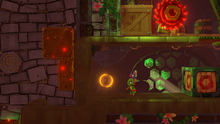 (Fig. 2d) A T.W.I.T. coin! |
|
~Coin 3~ |
After the fourth checkmate, there is a locked door with boxes before it. Buddy slam it to enter a hidden room (Fig. 3a). Break the box guarded by a singular sawblade, and grab the key inside of it (Fig. 3b). Leave the hidden area and open the locked door with the key (Fig. 3c). Enter the door to reveal the third T.W.I.T. coin. |   (Fig. 3a) A locked door with boxes before it that can be broken via buddy slam to reveal a secret room.   (Fig. 3b) Break the box and collect the key!   (Fig. 3c) Open the locked door with the key and enter the room.   (Fig. 3d) The third T.W.I.T. coin! |
|
~Coin 4~ |
When the player reaches a locked door next to an unstable trap door that is near another open door, the player can fall through the trap door and land on top of another trap door and can quickly jump to reach the open door (Fig. 4a). However, if the player buddy slams through the first trap door, they will fall through the second one as well and it is impossible to get back up. It is important for the player to fall naturally through the first one. Once inside the door, the player can grab the T.W.I.T. coin that is guarded by five buzzsaws |   (Fig. 4a) A locked door, an open door, and two trap doors. If the player falls naturally through the first door, they can use the second trap door to reach the open door. However, if the player buddy slams through the first trap door, they will instantly go through the second one. If the player does this, it is impossible to go back afterwards unless the player restarts the level.   (Fig. 4b) Five buzzsaws guarding a T.W.I.T. coin. |
|
~Coin 5~ |
At the eighth and final checkpoint found after the elevator section, there is a door marked by green lights found after the fifth and final Laylee Bell. The player can break the boxes to find and take a Quack Bomb. Once taken, the player can leave the room and reach the end of the level. At the end of the level with the trapped Royal Beettalion member, the player can jump over it and find to the left of it a cage with a light-green Quack Corp icon on it. Throw the Quack Bomb at it and jump in to collect the fifth T.W.I.T. coin. |  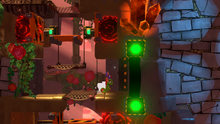 (Fig. 5a) An open door found after the eighth and final checkpoint, and after the fifth and final Laylee Bell.   (Fig. 5b) A room full of boxes and a Quillion. The box to the right contains a Quack Bomb.   (Fig. 5c) Collect the Quack Bomb and take it to the end of the level.   (Fig. 5d) To the left of the trapped Beettalion member, there's a cage with a light-green Quack-Corp icon. Spit out the Quack Bomb to destroy it and enter the hole.   (Fig. 5e) A T.W.I.T. coin inside of the hole! |


Ghost Quills[]
| Ghost Quills (In order of appearance throughout the level) | ||
|---|---|---|
|
Other Locations[]
Checkmates[]
In Factory Fright, aside from the first checkmate, there are _ checkmates in total within the level. In total, there are _ checkmates.
LC = Checkmate will disappear if the "Less Checkmates" tonic is equipped.
MC = Checkmate will only appear if the "More Checkmates" tonic is equipped.
| Checkmate | Description | Image | |
|---|---|---|---|
| At the beginning of the level, the first checkmate will appear exactly where the player spawns. | |||
Laylee Bells[]
Quillions[]
Secret Locations[]
| Click "Show" to reveal Secret Locations |
|---|